Table of Content
Divi, the most popular WordPress theme, with almost 1,000,000 downloads.
It includes the following features :
Blogging with WordPress to share your knowledge, increase your online visibility and turn it into a source of income is considered by many to be a daunting task.
This is not the case at all.
You can launch a blog in a few minutes without any difficulty.
Just follow the simple steps listed below to get your blog up and running.
Step 1: Choose a good web host

To blog with WordPress, you need a domain name and hosting.
The domain name is the address where your blog will be visible on the web.
And hosting is the space you will allocate with a hosting company to store all the files of your blog.
THE FOLLOWING AFTER THIS AD
How to find a domain name for your blog
Finding a relevant and suitable domain name that is not already taken is a rare thing.
Because no matter what niche you want to start a blog in, there are probably some blogs with the names you’ve been thinking about.
But that shouldn’t discourage you.
Because there are online tools called domain name generators that suggest you perfect available domain names when you submit them your keywords, terms related to your niche.
The best of these tools are assembled and proposed in this article.
Sign up for a WordPress hosting plan with a good hosting company
Before blogging with WordPress, it is very important to choose a good web host.
You have to make sure that the host has a good reputation and is proven.
Then, take your time to read the different features offered by the host for the desired plan and see if these features suit you.
Some hosting companies, depending on the plan, allow a certain number of visitors per month, grant a certain amount of bandwidth, offer an automatic backup and many other features.
It’s up to you to see if the proposed features suit you.
There are many hosting companies, and it takes a long time to compare them.
To save you time, I invite you to read this article where I have listed the features and functionality of the 20 best hosting WordPress.
Install the WordPress CMS
You have chosen your hosting company and subscribed to the hosting plan that suits you, now it’s time to install WordPress.
Many people will think that this is a technical step and will seek the help of a technician.
Installing WordPress is not at all complicated, it is very easy.
Modern web hosts make the process easy, they provide you with an installer in your client area where you just have to make a few clicks to get WordPress installed on your hosting space.
All you have to do is consult your host’s documentation, or contact their support team for guidance.
But if you don’t have the time, you can hire a professional to do it for you.
Step 2: Define a beautiful design for your blog
When you install WordPress, your blog takes on the appearance of the default WordPress theme.
This is a very minimalist theme design.
It incorporates a set of customizable blocks, image overlays and a few other features.
You can customize it how you want or choose a theme that has a specific style and features.
How to choose a WordPress theme for your blog
To change the look of your WordPress blog, you can opt for a free WordPress theme or a premium WordPress theme.
The advantages of a premium theme are numerous.
With a premium theme, you are sure to have a theme designed according to SEO standards, you will receive regular updates, you have access to a support team at all times, and many other benefits.
You have several platforms where to find a premium theme, but the reference of these platforms is Themeforest.
You will find all kinds of themes there.
But when you want to blog with WordPress, you can start with a free theme and opt for a premium theme when the blog would be evolving.
The best place to get a free WordPress theme is the wordPress directory.
You can access the themes in the WordPress directory from the management interface of your WordPress blog.
From your interface, put your mouse on the Appearance menu and click on the Themes submenu.
On the interface that appears, click on the Add button.

You will be redirected to an interface presenting the themes in the WordPress directory.
Enter the name of your theme in the search field, or browse through the suggestions and on the theme of your choice, place the cursor on it, and an Install button will appear, click on it.
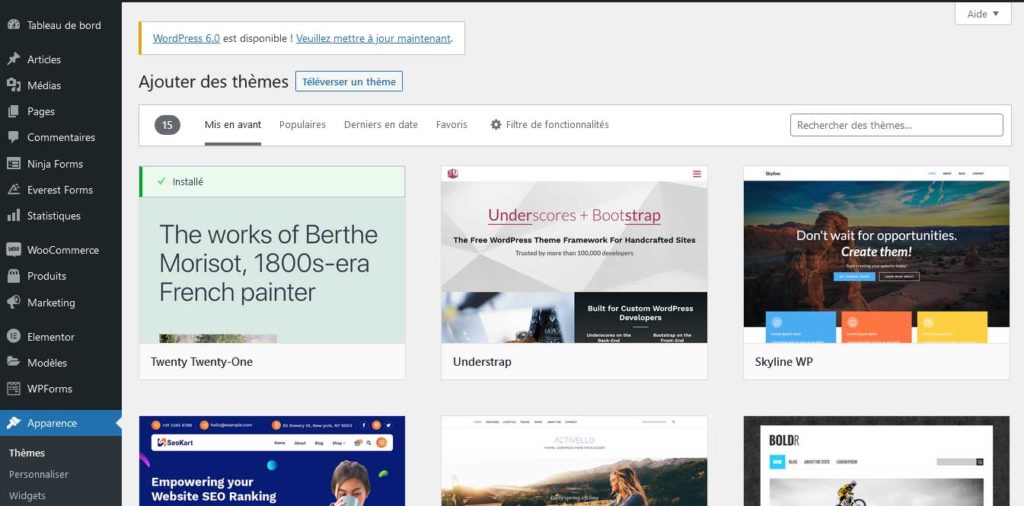
After installing the theme, click the Activate button to set it as the default theme for your blog.
Customize the interface of your blog
Once you have installed and activated the theme, your blog takes its style.
You can customize it so that it doesn’t look the same as the many people who will use the same theme.
To customize a WordPress theme, you need to go to the customization tool.
From the customization tool, you can make changes to your blog without having to write a line of code.
To go to the customization tool, go to the management interface of your WordPress blog, hover over the Appearance menu and in the sub-menus that will appear, click on Customize.
The customization tool will appear with the preview of your theme on the right and the customization options on the left.
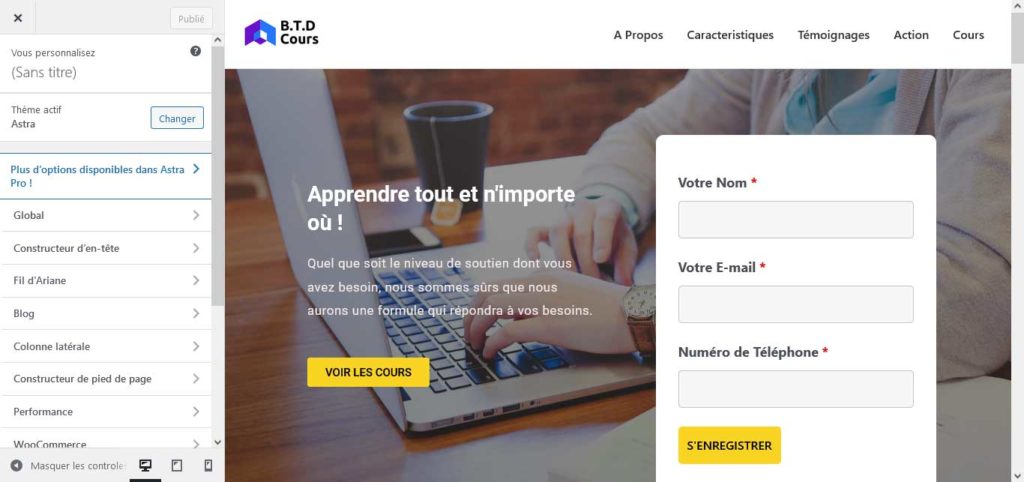
Use the options to make the desired changes to your WordPress blog and click the Publish button.
Step 3: Expand your blog’s functionality
The ability to extend the functionality of a WordPress blog or website is one of the strengths of the WordPress content management system.
To extend the functionality, you need to install the plugin that offers the desired functionality on your blog.
No matter what feature you want to add to your blog, you will probably find among the 56,000+ free plugins in the WordPress directory, one that offers it.
How to install a WordPress plugin
Installing a WordPress plugin is very easy, and anyone can do it.
Even a 10 year old child could do it in less than a minute.
But first, you should do some research on the plugin you would like to install.
Read reviews on that plugin, and see if there are better alternatives.
Once you are sure about the effectiveness of the plugin, you can now proceed to its installation.
On your management interface, hover your mouse over the Extensions menu and click on the Add submenu that appears.
You will be redirected to the page presenting the plugins in the WordPress directory.
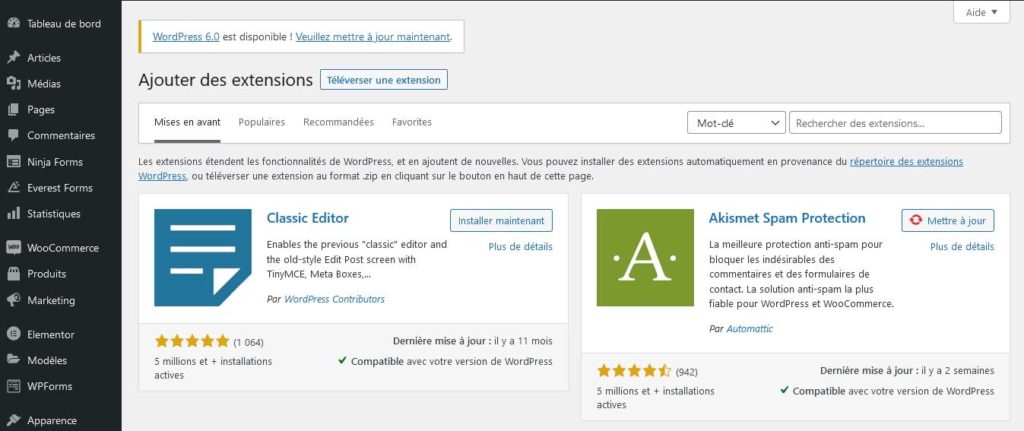
In the search field, enter the name of your plugin, and it will be displayed in the results, click on the Install Now button, present next to the plugin name.
Once the installation is done click on Activate, so that the functionality is effective on the blog.
The essential WordPress plugins for any WordPress blog
THE FOLLOWING AFTER THIS AD
There are mandatory features that must be present on every blog and website.
This implies that your WordPress blog to incorporate certain plugins.
These plugins are indispensable.
The first must-have plugin for a blog is Updraftplus.
It is a backup plugin.
It is very important to backup your blog regularly.
Your blog can crash due to a bad manipulation, or when a plugin conflicts with another one or due to an update.
If you don’t have a backup of your blog files, you can lost all your work when you blog breakdown.
The second plugin is Akismet, a security plugin.
It ensures the security of your blog by eliminating spam from comments and messages sent via the contact form.
WP Super Cache is also another essential plugin for blogs.
It helps you speed up the loading of your blog pages.
Check out this list of 10 WordPress plugins essential for a WordPress blog and website to find out what other plugins you will need to install on your blog.
Step 4: Write your first article
Now that your WordPress blog is active and has all the features it needs, you’ll have to write content.
Here is how to write an article on your WordPress blog.
Go to the management interface of your blog, on the Article menu, put the mouse down, and in the sub-menus that appear click on Add.
You will be redirected to the article edition page.
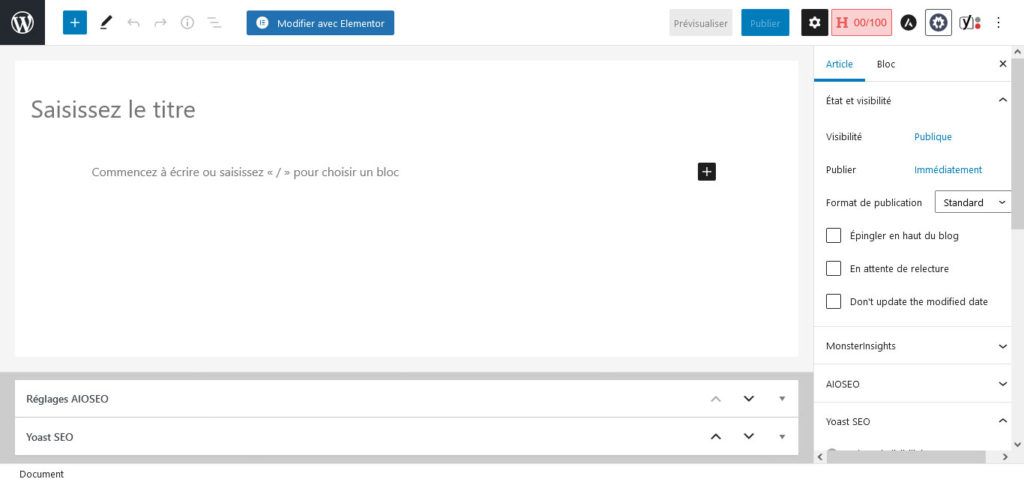
Enter the title of your article and add the content of your article, you can also integrate within your article an image or a video from the plus icon on the right of the writing page.
The article edition page interface is intuitive.
Find good images to illustrate the content of articles
Launch a blog, and start writing articles requires great illustrative images of good quality.
It is very important, they will contribute to the coherence of the content of the article.
Also among the SEO standards to consider for an article, the use of images within an article is part of it.
But where to find beautiful illustrative images?
There are many online platforms called image banks that offer all kinds of images.
There are some free image banks where you can download good quality images for your articles or any project requiring an image.
Discover in this article the 20 best free image banks where you can download any kind of good quality image.
Other essential elements for a blog
Install Google Analytics to track the development of your blog
Start a blog is the first step of the process, the second step of the process is to make it grow.
Make it evolve goes through by knowing the visits recorded on the blog, the origin of the visitors, the pages they visit, the links they click, in short all the information concerning your blog.
All these data in addition to inform you about the evolution of your blog, guide you to focus on the strengths of your blog, and improve its weakness if possible.
The tool that allows you to have all this data is Google Analytics.
To do this, you create your Google Analytics account by entering the requested information and then you get a tracking code that you integrate on your WordPress blog.
You can embed this code manually or by using a WordPress plugin.
I wrote an article where is shown step by step how to create your Google Analytics account until you get the tracking code.
Then I present in the article how to integrate the tracking code manually or using the plugins MonsterInsights and Insert Headers&Footers.
The article is available at this address.
Work on the SEO to optimize the blog’s referencing

It’s beneficial to consider SEO when creating a blog.
Your blog posts will appear on the first pages of search engine results only if they are well optimized for SEO.
The direct consequence of this is an increase in your traffic.
You should not neglect to work on the SEO of your blog at all, you should take it into account as soon as you set up your blog.
There are several WordPress SEO plugins.
In this article I will recommend you to use Rank Math.
It is comprehensive and offers excellent features, it helps to optimize your WordPress blog and website for search engines.
It is a plugin that is active on more than a million WordPress websites.
Install it and activate it, it helps you to set up a WordPress sitemap for search engines, it makes suggestions to improve your pages.
It offers many other advantages.
There are other alternatives such as Yoast SEO and All in One SEO.
Resources published on the blog
15 Free Hosting of Website Without Ads
40+ best responsive themes (wordpress, woocommerce, shopify, prestashop, drupal)
12 best platform for blogs to share content and inform
Beginner’s Guide: How to duplicate a page in WordPress or a post in WordPress?
Beginner’s Guide: How login WordPress admin, Modify it and Secure it

